Senior Environment/Technical Artist Portfolio
Christopher Green


Technical Art

Brush Stroked Normals
Brush Stroked Normals in Substance Painter/Designer for The Killing Stone
Early in the game's development as we were experimenting with different artistic styles we came across a few articles where artists were using manually painted world space normals to embed brush stroke details into the texture. What really appealed to us was that is worked seamlessly with regular Unreal lighting unlike some other more post process heavy solutions. Our main concern was that the burden of manually painting each model would drive the texturing cost up so I set about doing some prototyping.
Our initial solution was to use the tile sampler node in Substance Designer to scatter the brush strokes. The main problem here was that we needed a way to guide the brush strokes to follow the surface, and correct for UV island orientation. We also had a problem with the brush strokes bleeding across UV islands as the strokes were scattered on the texture without a notion of the 3D geometry. It was also very processing heavy, which slowed down iteration time in Painter.
-
Guiding - We created a comb map setup in painter so the artists could paint the surface to effectively groom a utility map of arrows with full artistic control.
-
Bleeding / Processing - We shifted the brush strokes to only affect a position swatch which was then pushed into one of the user channels. The position map would then be used in a filter that could quickly process any number of channels to apply the brush strokes uniformly. Using painters anchor point system we placed an anchor point just prior to the brush stroke filtering enabling us to restore any areas where the brush strokes were bleeding incorrectly quickly and efficiently.
-
Artistic Touch - Layering allowed manual painting to be layered on top, allowing for easy cleanup and full artist control.
Early in development we were exporting the resulting world space textures to be baked into tangent space for use in engine as a separate step. Eventually we found an excellent world to tangent space converter that could be layered on top, speeding up iteration time.
The result was very artist friendly as they could employ any modelling and baking processes that they desired. We found with certain cloth patterns and character details required a slightly different setup but one that the process handily supported. In these cases it made more sense to do simple coloring with patterns as a base layer, applying the brush stroke filtering to a baked light and curvature layer applied as an overlay. The normal map and slight overlay gave the strong sense of brush painting without destroying the finer details. We could also apply the brush strokes to a noise texture and overlay it at a low opacity to give a slightly mottled look.


Scare System
Scare System in Blueprint for The Killing Stone
Around halfway through development of the game we started building the "Scare System" which was intended to help create mood and ambiance as the player explored the mansion. The main requirements were that it needed to be systemic in nature as to not overburden our designers, and needed to be flexible so that we could implement a lot of different kinds of scenes. We also didn't want the scares to repeat as we felt it would cheapen the overall experience.
I began by prototyping using a set piece scare that our art director Stephen Alexander had put together as the initial base. That helped to build out the general framework which at its core revolved around a character that could play the action, a light that would turn on to illuminate the scare, and some kind of sound "sting" to draw attention to it.
After basic prototyping was working it still lacked a lot of the connective tissue that was needed, mainly some kind of global mechanism that could be responsible with helping the individual scares coordinate. Our Gameplay Engineer Gretchen Carlson was gracious enough to lend me a hand and implemented that component which allowed me to focus on individual implementation and polish.
A lot of effort was put into the trigger logic and gating for the scares. As mentioned earlier we wanted these scares to be largely systemic which meant checking things like act structure, current active family member, even time of day to see if the scare should be allowed. The scares also needed to have other gating mechanisms like current facing. We didn't have any kind of look triggers in engine so I made a simple dot product check between a location marker and the players facing direction which allowed for a configurable threshold to limit the scare based on facing direction. Also as these were only supposed to play once we needed to read the save file on initialization and add the information to the save once played so they truly could only be experienced once per save profile.
At launch I had added over 25 different scares for the game, each customized for their location and needs. Some examples:
-
Mariken's Teaser - The player exits the bedroom and sees the flickering shadow of Mariken, brightly illuminated against the ajar door accompanied by a sharp sudden sting.
-
One Eye's Violin - The player upon returning to the den is greeted by the haunting song of One Eye playing his violin. This scare is dynamic as One Eye's shadow is visible on the second floor but if approached will cease playing and disappear.
-
Family Figurines - During the witching hour the player has a breadcrumb trail of life-size statuettes of the family members that lead them through the house. This dynamic scare involves the figurine slowly approaching before coming to rest, retreating if the player gets too close.
-
Hide and Seek - Once the player has progressed some through the game they are introduced to the Savant. The savant wants to play a game of hide and seek. When the scare activates the savant giggles in the distance and appears, but is only visible in the player's peripheral vision. If the player gets close enough the savant reveals themselves for a moment before invisibly scurrying away. If the player doesn't find them they silently retreat and the game is over.
-
This was an especially fun one to implement. I took the facing logic I had put together for the scare trigger and added it with a basic distance check to a tick function. That way when the scare was triggered I could turn on the tick, have the information needed to implement the game and once done disable everything, keeping it performant.
-
Once the scare system was up and running we had some of the bigger moments that we wanted but it still felt like there was a bit of a lull happening between the scares and regular gameplay. Early on in the scare prototyping we had played with the notion of having footsteps audible nearby but without some visual component it didn't feel impactful enough to be a scare. We realized though that it helped to keep the house be a bit more alive. I took the initial footstep scare and built it out to be a standalone scare actor that could be sprinkled through the level for added effect. I also coupled it with some of the Savant's footstep elements so as you progress through the game the footstep audio has a chance to be the wet inky savant variant. To randomize it a bit I made the actors be configurable to be linear or radial so they could adapt to hallways and open rooms and reposition the effects so triggering the same actor wouldn't give the same experience.
A final piece of polish that was added later on was the notion of scare decorators. These were standalone actors placed with the scares that would be off by default and would then be toggled on by the scares themselves. This meant that the scares could clean themselves up but still possibly leave some mark behind that they were there. This was important for scares like One Eye so he could leave his violin, or the Savant leaving puddles of ink.


House Modeling and Decay
House Modeling and Decay in Houdini/Blueprint for The Killing Stone
When we started working on the pretty corner for the game we had recently shifted focus from more action oriented vision of the game to the card battler that we shipped with. We looked at a few of the sketched out layouts that we had and decided that we would use the family den as our pretty corner.
To maximize flexibility I took the rough greyblock that we had put together using primitives in engine and exported it to blender. I cleaned away any extraneous geometry and moved the cleaned geo over to Houdini. I then started creating logic for adding details like decorative trimming round the floor, supportive beams to the rafters, decorative paneling to the ceiling. This paid dividends as we shifted the layout a number of times, mainly to clarify player pathing and reduce distances to eliminate as much backtracking and downtime as we could. By having most of the details defined procedurally we could always return to the rough layout in blender and have it updated by Houdini in a simple export.
Originally there were some tests I made doing things like procedural modeling on the ceiling panels and decorative wall trim that ended up being too difficult to maintain, particularly when it came to giving them UVs and textures. Instead I took the original intent and modelled swatch panels that could then be arrayed and cut to size to create the same but more polished effect.
Partway through development I started playing with the notion that the house should change to adapt to the player's progress. Fictionally the protective wards on the house are being eroded and each playable family member has a bit of their own theme; Malthe - Decay, Ras - Water, Vollem - Ice. I updated the architectural material with global parameters and effects for each, then used Houdini to apply vertex colors for each effect. Once this was successful I expanded the options to include some of the other props and decorative items in the environment. We hooked the parameters into the game state which meant that we could access them easily from blueprints as needed.
To enhance the effect we made decay decorators which were basic in concept but quite powerful in their utility. At a basic level the decorator could have one of the parameters decay/wet/frost set as a threshold and if that cutoff value was met then they would be visible. The enabled state could be overridden so more nuanced applications we easily doable. Using this we put in water drips that eventually froze into icicles, expanding pools of collision geo to enable wet footsteps, and windows that progressively visibly cracked letting more of the whistling wind into the house.


Materials - TKS
Materials of The Killing Stone
Materials for the Killing Stone were developed from the start to be iteration friendly for the entirety of the layout/modeling process. Often later in the process we added specific effects to ground each element and pull things together. For example most outdoor geometry needed z axis snow to match with the snowy terrain.
Early in the process we adopted a strategy we had used in previous titles, setting up individual material instances for each model based on an automated script. Using this "Previs" material we would have basic color and material controls, a nice editor grid, and the ability to select all temp geometry in the map based on the material association. Once the model was finished we would simply reparent it to the appropriate Parent Material.
As development continued we diversified the materials with other options and a greater range of versions while still keeping them as artist friendly as possible. For example, the Architecture material had better tinting controls as well as supported a system we called the decay system. This meant that any architecture asset could have decay, wetness and frost applied to it, revealed by gameplay driven global parameters.
These are some of the materials I authored and managed:
-
PBR Parent - Main material for game
-
Mainly needed for basic Diffuse, Normal, and Mask inputs. Later added toggles with procedural masking for wetness and snow.
-
-
Architecture - Main architecture material
-
Setup as a counter point to Primary Parent to support wider use with the architecture.
-
Able to tint and diffuse the base textures for better integration in more dilapidated areas.
-
Global parameters could layer decay, wetness, and frost to match game progression.
-
-
Previs - Basic initial material for most materials
-
Basic color and other material controls.
-
World space grid for easy layout work.
-
Custom Data individual tinting support
-
-
Windows - Frosted glass for all of the exterior facing windows
-
Basic frosted glass with the option of an additional fake HDR to boost reflections
-
Frosting and snow accumulation could be applied based on vertex colors from Houdini. This allowed for accumulation based on whole vertical window, individual panes, and around the frames.
-
Dynamic cracking by offsetting the texture and masking the crack effect using a pane mask texture. Each window would offset the texture's values effectively randomizing which ones would be cracked and to what degree.
-
-
Eyes - Eye material used for the characters
-
Needed the concave shape of the cornea to better catch the specular highlights.
-
Fake HDR reflection to increase the perception of "wetness."
-
Parallax to give the iris and pupil a bit more perceived depth.
-
Eye dilation applied to the UVs of the diffuse so each character could have a little bit of differentiation beyond their basic color changes.
-


Artist Toolkit Automation
The Artist Toolkit Automation in UE5 Utility Blueprints for Question
During the Blackout Club we started experimenting with Editor "Blutilities" as they were known at the time for streamlining the capturing of thumbnails for our in game cosmetics. Though not as much of the flexibility was available then we saw the potential for using editor utility blueprints to streamline if not fully automate tasks in engine.
Over the course of The Blackout Club, South Park: Snow Day! and The Killing Stone we expanded out our options and fleshed out a library that became internally known as the ATK or Artist Tool Kit.
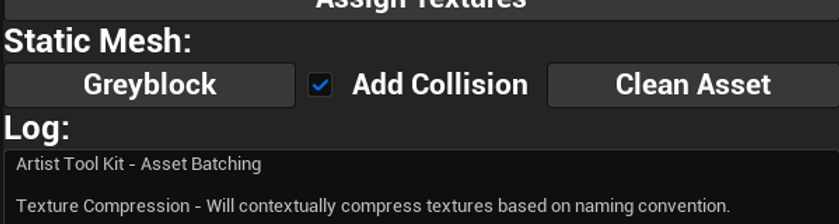
This was initially built for the art team to use when adding assets to the engine or decorating levels with them but was expanded over time. At its base the ATK was a simple editor utility widget that had buttons to spawn a few different utilities. This was done so artists could keep the ATK docked somewhere in their UI and have easy access to any new tools without having to track them down. Modelers would usually use the Asset automation panel, anyone working in a level would use the Level Design tools panel. Where possible utility scripts were built standalone so they could be called from the script pulldown and were also made to use the editors undo buffer in case any mistakes happened. Later on they also used Editor Utility Tasks particularly on the asset side so the operations could be multithreaded and more stable.
For the Asset panel we had:
-
Texture Compression - Would loop through any selected textures using an a Editor Utility Task setup and compress textures using their desired settings based on their naming convention. It had Environment, Character, and UI variants to make sure each would be assigned to their desired texture group.
-
Assign Textures - When selecting a material instance and a set of textures this would assign the textures to the desired slots of the material.
-
Greyblock setup - This would take a rough proxy mesh created externally or in editor and clean up the asset, create rough hull collision, and create/assign a previs material instance to the mesh so it could be ready for use in level.
-
Log - A simple log to report back on any operations performed.
For the Level Design Tools:
-
Measure Distance - Would perform a simple distance check between the selected asset and the camera, very useful for culling setup and bug fixing.
-
Organize Current - Would take any selected actors and put them into folders based on the defined hierarchy in the script. For example it would take any lighting actors and put them in the Lighting folder. This was particularly useful for more specialized decorators to keep them all nice and clean
-
Batch Rename - This script would loop through all selected actors and rename them based on their assign static mesh asset. We often would prototype with cubes and when replacing actors the initial name would remain which lead to a lot of Box_0034 actors. The script would use the static mesh asset as a base and add a randomized number string which helped with debugging.
-
Custom Data Colors - Mainly used in early prototyping, our previs material supported custom data and so we could have placed actors all with the share material be tagged in a different color per placed instance. This along with our custom note system promoted asynchronous communication, such as opening a map and seeing a note to replace all red doorways with double doors.


Kid Fortifications
Kids Fortifications in Houdini for South Park: Snow Day!
In South Park: Snow Day! it was very important to us that the fortifications that the kids were building as part of their game felt cobbled together very quickly in a slapdash way. I started prototyping a way for us to use PDG in Houdini as a way of ingesting very rough block in models and spit out polished models that were ready for texturing.
The process looked something like this:
-
Model a basic layout
-
Add long thin blocks that would be processed and become wood planks
-
Add basic intersecting planes anywhere that we wanted loops of rope
-
Add any other details, such as cardboard, nails or other such elements. These needed to be modeled as desired and have a basic UV layout.
-
-
Ingest into Houdini PDG graph
-
Houdini would go over a preset directory and pull in any files.
-
It would then filter those based on file type and then pair them based on naming convention, combining them into work items.
-
-
Process the work items
-
Temp Mesh - Basic modelling work
-
Converted blocks to wood and cards to rope loops via their own HDA subgraphs
-
Colored each section for ID
-
Processed the combined mesh through a RizomUV processor for high quality packed UVs
-
-
Bake Mesh - Setup a copy of the temp mesh for use in Substance Painter with necessary naming and values so painter would populate textures into their appropriate slots based on naming convention.
-
Asset Mesh - Setup a cleaned copy of the temp mesh for use in engine.
-
Texture Baking - Baked basic textures, as well as an ID texture and random element texture for randomizing the tinting of wood and other pieces.
-


Snow Texturing
Snow Texturing in Substance Painter/Designer for South Park: Snow Day!
Given the setting of South Park: Snow Day! it was clear from the start that we needed a good way of applying snow in texture to our models. I was responsible for prototyping and developing the toolset needed in Substance Designer and Substance Painter.
Our initial test for snow was the iconic tree for the show, mainly focusing on the quality of the snow itself, painting the distribution in very carefully to match the reference from the show. Once we felt comfortable with the material quality of the snow itself I shifted focus to how we might quickly apply snow to a variety of assets. Our main goals were for the snow to feel natural and to have accumulated quickly during the cold, retaining that soft puffy quality of new snow. From our initial test we had good results generating puffy normals based on the shape of the snow mask itself. So the main missing component was a way to quickly and cleanly generate that mask.
The next step was to create a snow mask building in Substance Designer. The building focused on three different methods of accumulation; snowfall from above, snow building up around the base, and snow accumulating in cracks and crevices. For snowfall we used the world normals and position maps to create a upward facing mask. For the build up we simply use a bottom up mask based on the position map. For the crevices we mainly used the dark areas of the AO with contributions from the curvature.
We also wanted to have as much artistic control as possible so a paintable layer could be fed into the snow mask. This was inspired by some work that Arkane did on Deathloop. The paintable layer was middle grey by default, white would contribute to the snow, black would remove it. This gave artists the ability to quickly and cleanly edit the generated results and add their own touch to the snow.
Each of the above masks were combined and mixed with a snow noise texture. The snow noise texture could be flat or triplanar projected and have its tiling changed. This gave us free control to compensate and alter its scale for larger or smaller assets. The resulting snow mask was sampled by an anchor point and fed into the Snow material itself but could also be sampled elsewhere, for example to cull the emissive effects inside fake windows.
The snow material would then take the alpha shape and generate the necessary normal map to give it the puffy look we desired. Because this effect was generated and not baked we did need to paint out areas where the generated snow crossed a UV seam but the work was pretty minimal relatively speaking.
Once in engine we had any asset close to the landscape or important, would use materials that generated a subsurface scattering mask. This was done simply by sampling the blue channel of the base color and running it through a lerp and subsequent clamp to manipulate its values into a stable and clean mask.


"Schmupify"
"Schmupify" Process in Houdini for South Park: Snow Day!
In South Park: Snow Day! we created a process which we jokingly named "Schmupify" to help take photoreal assets from sources like photogrammetry or bought asset packs and unify their overall shading and textures to something that would fit the South Park aesthetic.
The goals for this process were:
-
Needs to be fast and iteration friendly
-
Apply to a wide range of source material
-
Remove most surface noise while retaining the identity of the asset
I started in Houdini by taking a single asset and trying to blend and remove a lot of the surface noise while keeping the overall shape and surface qualities. A lot of this relied on Mesh Sharpen simplifying the high poly, and then baking normal/ao/curvature textures to match. This was turned into a packaged HDA for easy maintenance and then migrated into a PDG powered graph. By using PDG we could simply add new assets to the directory and re-run any any assets we wanted to iterate on.
Once the assets were baked most of the time we would move to Substance Painter and use the original low poly asset and initial textures as a starting point plus the baked textures from Houdini, though we also had the updated high poly if that was needed. I created a "Schmupify" material for Painter that would blend and simplify channels globally or individually. It also had options for shuffling around existing mask textures so their channels would map correctly. After hooking up the Houdini baked textures we would usually start from scratch on any natural assets so they could all have a unified treatment. For man-made assets like fire extinguishers that had an existing texture we would use the Schmupify material to simplify the base color/roughness/metallic.
The result for was easy processing to get simplified baked details, e hookup in painter and a clean way to reduce details in existing texture sets.


"Light Maker"
Light Maker in UE5 Blueprint for South Park: Snow Day!
Early on in the development of South Park: Snow Day! we decided that to keep performance high we needed to rely on Lightmass baked lighting for the game. We were interested in having different times of day as well as being able to reuse the smaller submaps through the game so we set up a basic lighting scenario framework. This was particularly helpful for the social hub as we could alter the lighting and weather to match their progression through the fictional day.
However this meant decoupling light actors from their associated meshes and meant we needed some tools for maintaining them and keeping them organized. I started to build a light maker editor widget and special blueprints for the light source/buildings.
The goals for this process were:
-
Enable easy creation and maintenance of lighting
-
Support lighting scenarios effectively, especially maps in different locations as well as day vs night.
-
Smooth process of iterating on lighting.
I started with the buildings as they were large chunks of real estate that we were already working on and wanted to finesse their appearance. We already were instancing things like windows and generating custom data to adjust the emissive produced by each as if there were lights on or off in the interior. I added logic so the widget could pull information on window location, custom data, even rough dimensions and desired light type. Using that information we could select a building and with a click spawn new rectangular light actors for each of the window that was illuminated. Light source actors worked in a similar way which meant that once hooked up you could select something like a street light and have it spawn the correct lights for that location. There was basic logic for updating these once moved but often it wasn't needed and was easier to just spawn a new set of lighting.
Day vs Night was pretty simple for our needs, we simply added a global parameter to the materials used for things like cars and light sources that could be updated in the game state. Then we simply spawned light actors in the lighting scenarios that were dark enough to be considered night. We had an override toggle to retain control should there need to be any light that needed to be on all the time.
For smoothing the iteration process, I found that a lot of the iteration slow down tended to come from copying and pasting desired values to many different lights in a controlled way. We already had a name associated set up so any light that was spawned would be named in a sensible way so we could easily isolate similar lights. I added logic to the widget so an artist could select a light with the preferred settings and cache the key values like color, intensity, etc to the widget and then apply those settings to any number of selections. This made iterating pretty fun honestly as you could focus in on one scene and then spread the effect through the level quiet fast.


Modular Weapons
Modular Weapons in Substance/Blueprint for South Park: Snow Day!
Early on in the development of South Park: Snow Day! we were working on a more Diablo style loot system with traditional rpg components. This was later discarded for a more simplified action focused weapon set but I had the pleasure of working on the prototype with one of our engineers Nick Cosgrove. Our goal was to support various components that could map to distinct design parameters so we could visually build up the weaponry and have the option for player customization.
My original proposal based on our dagger was to have:
-
Hilt
-
Guard
-
Blade
-
Charm
-
"Spirit"
Each of these though initially laid out for our test dagger would have a matching component on all weaponry. Hilt/Guard/Blade would be a part of the core weapon and change based on physical material and damage potential. Charm and Spirit would have mapped socket locations and be shared across weaponry, spirit being some kind of token that could but stuck on like a sticker, charms being to same idea by attached via lanyard to give each weapon a part that could respond to physics and enhance the feeling of movement.
Though they didn't ship in this state the dna is present as most final weaponry was modelled as component parts to fit the modular system. It also prompted us to create the "universal" weapons, templates that could be used by our animator Alonso Soriano. These were very helpful so he could predict safe regions, avoid penetration and know where the damage dealing elements were supposed to land.
Nick was incredibly helpful in taking a prototype Python script I made and producing a front end that could bake meshes via the Substance Automation Toolkit. I had originally put the python script together as a proof of concept for feeding mesh data in and getting baked textures out without extra setup. I also had working versions for various mutator templates using the SAT where the script would produced altered variants of the templates for rendering finished textures. This was incredibly powerful as we could feed mesh data for something like a dagger, and have the script produce and export not just the bake files, but the finished textures for cardboard, bronze, and steel which were our weapon testing materials.
To keep maintenance of weapon cohesion and our ability to evaluate at a glance I set up a playground for the weapons with a previs blueprint. The blueprint would loop through each component based on weapon type and rarity, assembling all the allowed permutations of the weapons on walls. This way we could check if there were any visual errors and ensure that the pieces married together in a plausible and fun way.
This system showed me a lot in terms of the potential when it came to lovingly making a smart material and it making great highly polished results in a procedural network in a way I hadn't quite encountered before. That said even though it wasn't a part of the finished game I'm very proud of the hand polished weapons that it helped me achieve.


Utility Graphs
Utility Graphs in Substance Designer for Question Games
Over the course of my time at Question Games I built out various utilities in Substance Designer that were employed over each of its projects. Most were simple utilities to make work easier and more streamlined but some helped to define the way we produced artwork.
-
Stylized Edgewear - Using the standard we piped in a variety of our own more stylized noise patterns. This helped to cutdown on the photoreal quality while still fulfilling its intended use. We also coupled this with painted weighting inspired by Arkane's work on Deathloop so we could paint in and out extra wear for better control.
-
Gradient Mapper - This utility was meant to ease the process of introducing color variation into a texture. The artist inputs whatever texture they want and then selects for a number of prebuilt gradient maps that are dynamically mapped to the input. With controls for tinting, value chaos as well as others, they can freely mix the colors around while still getting a cohesive result that can then be layered over whatever they like. This was particularly useful for taking random color bakes and pulling them in to randomize pieces of wood and other such natural materials.
-
Stylizer - This was a simple way to introduce a little bit of baked detail into the base color. It uses a lot of the standard tricks used in stylized art like using curvature edges, deepening ambient occlusion or adding fake top down lighting. This was particularly useful when applied as a filter as it could take a somewhat photoreal source and with a little intermediate blending make a nicely stylized result for texturing.
-
Signed Distance Generator - SDF textures are very useful in a lot of applications and we began experimenting with them for UI and certain VFX applications. This generator simply creates an approximate SDF for any input texture.
-
Templates - An often underused part of Substance Designer in my opinion is the ability to define a template. This can be incredibly useful for pre-making some of the tedious markup that can be so useful for a clean and readable graph. We also experimented with dynamically mutating templates using the Substance Toolkit for a time which had a lot of potential but was agreed to not be necessary for our direction for the game.


